How To Name Inventory Locations
A Place for Everything and a Label for Every Place
Inventory location names exist so you know where to put stuff and where stuff is put. Sounds simple, but walk into any business, and you’ll find lots of items stored in locations that aren’t clearly labeled or don’t have a well thought-out, commonly understood name. A location name doesn’t need to be too complicated or cryptic. In many enterprises, the people working there day to day will already have common terms they use to describe various locations. If that’s the case, then build on the common understanding when you can. If you have lots of locations, bins, large rooms, or large storage areas, then this guide will help you organize your thinking on how to name inventory locations. For more information on inventory labels, visit our guide: How To Make Good Labels For Inventory Locations

How to Create Inventory Location Names
Key Considerations
- Inventory location names should be unique. No two locations should ever have the same name.
- EVERY physical space in your facility should have a location name, even if you don’t currently store anything in that space.
- Where practical, EVERY location should be labeled.
- The location labels should contain the full name of the location and, if possible, have arrows that point to the location.
- If you have more than one “room,” consider using zone names or room names.
- Zone/room names should be abbreviated (usually to a single letter) and contained in the full location names.
- Within a zone or room, location names should ascend from top to bottom and from left to right. (To understand this concept better, please follow the detailed guide below.)
Within a zone or room, inventory location names should ascend from top to bottom and from left to right. (To understand this concept better, please follow the detailed guide below.)


Break Down Inventory Locations into Zones or Groups
If your inventory operations cover more than one facility, or a large facility, of if you’d just like to be able to group locations together for reporting purposes, we recommend creating zones, or location groups. If you don’t think you’ll need to use zones or groups, skip to step 2 below.
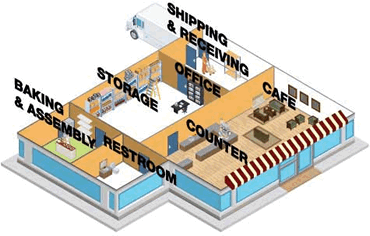
As you can see, the store has many rooms. And each room has a name used by the employees.
The room names are as follows (see fig. 4, right):
- SHIPPING & RECEIVING
- OFFICE
- CAFE
- STORAGE
- COUNTER
- BAKING & ASSEMBLY
- RESTROOM
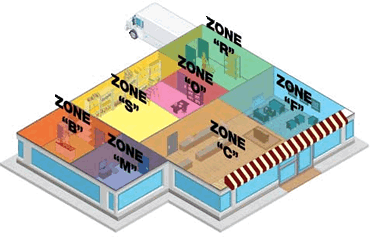
By abbreviating each room name, we can easily incorporate it into the inventory location name without making our location names too long. This will help when viewing location names in tables and on labels.
We can abbreviate as follows (see fig. 5, right):
- SHIPPING & RECEIVING – “R”
- OFFICE – “O”
- CAFE – “F”
- STORAGE – “S”
- COUNTER – “C”
- BAKING & ASSEMBLY – “B”
- RESTROOM – “M”
Why are we doing this?
If you store your items in a small area or one room, you don’t need to use zones because you only have one zone. But if you have a large storage area or more than one room, you’re going to benefit by breaking down your space into manageable smaller chunks.
Some of the benefits are obvious:
- You can find inventory locations faster.
- You can find inventory locations easier.
Others, not so much:
- You have the ability to reuse zone names.
- You can sort data, print count sheets, and do other activities by zone.
- Abbreviations make it easier to type in location names.
- Abbreviations make it easier to include the zone names on location labels.
- Reports “read easier” when the same long word doesn’t appear over and over again.
- There’s no confusion about what a place is called.
Shortening the zone name to just one letter will help us meet our goal of including the full inventory location name on every label. In a short amount of time, people using the inventory system will associate the one-letter name with the longer description of the zone.
How to Create Section Names
Whether or not you use zones or groups for your inventory locations, at some point you’ll get to the “room” level. Consider dividing up your room into sections. Some rooms will lend themselves to natural sectioning (for instance, rooms with rows of shelving can be easily divided into aisles). When naming sections, it may help to have a consistent method of creating section names. This will help users find locations quickly and easily. Below we present one method, which illustrates some of the thinking that might go into creating section

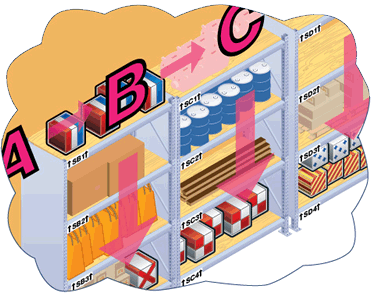
The storage zone has now been divided into sections labeled A through H (fig. 6). While in this illustration the sections correspond with shelves, the main point is this: An area or zone should be divided into sections that can be viewed without a person needing to move their feet. For instance, if you tell a person an item is located in “Zone S, Section B”, that person knows enough to get to the section, stop walking, and start looking right in front of them for the exact location. This may seem like an obvious point, but you’d be surprised at the number of location naming schemes that do not achieve this very simple goal. You can use letters or numbers, but make sure that the sections ASCEND from left to right, in a clockwise fashion. You may want to start your section names with the section that is closest to you as you enter the room.
Now that we’ve explained how to name zones and sections, let’s look at the detailed location names themselves.
Putting It All Together – Detailed Names for Inventory Locations
When naming your exact inventory location within a section, it’s best to use numbers, starting with the lowest number at the highest location and descending toward the floor. The main reason for this is that it will match the way your inventory reports will print out. Consider the figures below:

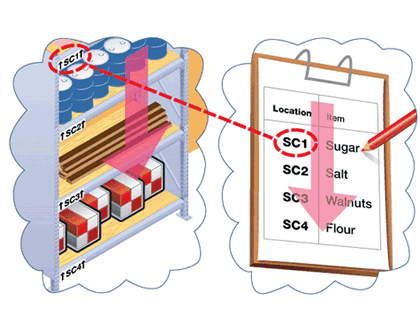
Consider the task of someone taking an entire inventory count. All the locations will be printed along with what should be contained in them. Using this location naming scheme, the person can move through your facility in an orderly fashion, and the “paper world” matches the “physical world” perfectly.
Every enterprise has its own unique layout and structures. The above guide to location names is just that—a guide. You will no doubt need to make your own adjustments, but the important principle is this:
In our example, the location names start with a room or zone, then a section, then a specific name. If you have more than one facility, your location names might start with the facility name, then the zone name, section, and place. If you have a big warehouse, your location name might include an aisle, etc. You get the idea.
So grab a piece of paper, sketch out your facility, break it into small pieces, and create your zones. Then get a rough idea of where you want your sections to start.
Now you’re ready to create and apply your labels.

Any pretty good location name acts like a funnel, starting with the general and moving to the specific. (This is an idea that will be repeated in other areas of inventory management.)